Want a FREE quote? Call or text - English (305) 409-9022 | Español (305) 310-2827
Want a FREE quote? Call or text
English (305) 409-9022 | Español (305) 310-2827
The Process
Home / The Process
-At 343 Epoxy, we don’t just coat floors, we create surfaces built to perform and built to impress. Every project starts with attention to detail, solid prep, and a crew that takes pride in their craft. We show up early, fully loaded, and ready to turn your space into something that stands out.
-Before we get started, we walk the site with you, go over your color selections, and explain the full process so you know exactly what to expect. Our trailers are equipped with everything needed to complete most residential and light commercial floors in just one day, without cutting corners or rushing the quality.
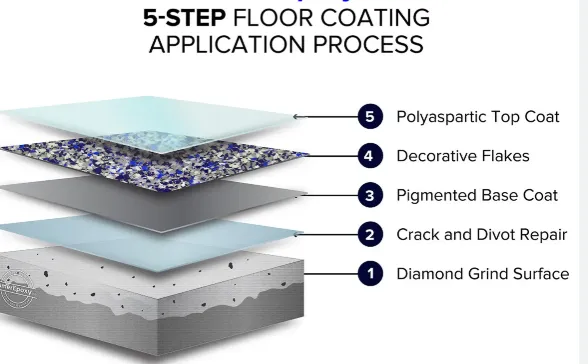
The 343 Epoxy 5-Step System
STEP 1 – Surface Prep, Diamond Grinding
A great floor starts with the right foundation. We mechanically grind the entire concrete surface using industrial diamond grinders attached to HEPA-filtered vacuums. This removes old coatings, opens the pores of the concrete, and ensures maximum adhesion for your new floor.
We check the hardness of your slab and choose the correct tooling for a clean, consistent grind. Every corner and edge is handled by hand to make sure nothing gets missed. Once prep is complete, we vacuum and clean everything until the floor is spotless.
This step can also include prepping vertical or detailed areas such as:
• Foundation or block walls
• Baseboards
• Steps and transitions
⸻
STEP 2 – Crack and Surface Repair
Concrete isn’t perfect, and that’s fine — we fix every flaw before moving forward. Hairline cracks are opened up and filled with a fast-curing repair compound that sets solid in minutes. Chips, pits, and rough spots are patched, sanded, and leveled to create a smooth, uniform surface.
Once repairs are finished, we do a final vacuum pass to make sure the area is completely clean and ready for coating.
⸻
STEP 3 – Epoxy Basecoat Application
This is where the transformation starts. We roll out a pigmented epoxy basecoat that’s built for strength, adhesion, and long-term performance. Each base layer is custom-tinted to complement your chosen flake blend or color scheme.
Before rolling, we vacuum again to make sure nothing interferes with bonding.
Depending on the floor size and system, we offer:
• 1-Day System: Light foot traffic the following day
• 2-Day System: Full use within 48 hours
Our crew applies the basecoat evenly across the floor, including all edges and vertical surfaces, then broadcasts decorative flakes across the surface for full coverage.
⸻
STEP 4 – Full Flake Broadcast
As one installer rolls the coating, another evenly broadcasts flakes for complete 100% coverage. We use more flake material than the industry standard to ensure even texture, full saturation, and a clean, consistent look.
Once the base layer cures, usually within an hour, we scrape the surface smooth, vacuum up loose flakes, and prep the floor for the final topcoat.
⸻
STEP 5 – Polyaspartic Clear Topcoat
To seal everything in, we apply a UV-stable polyaspartic topcoat using a squeegee and back-roll method for an even, glossy finish. This layer locks out moisture, resists scratches, and protects against UV fading — perfect for South Florida heat and humidity.
Typical Curing Times:
• Light foot traffic, 12 hours
• Normal use, 24 hours
• Furniture or storage, 48 hours
• Vehicle traffic, 96 hours
Our team will confirm the best timing for your floor based on weather and humidity to make sure it cures perfectly.
⸻
Clean and Professional Finish
We take pride in our cleanup just as much as the coating. Once the project is complete, we pack up all materials and equipment, leaving you with a spotless, ready-to-use floor that’s built to last and made to stand out.
⸻
10-Year Limited Warranty
Every floor installed by 343 Epoxy comes backed by a 10-year limited warranty covering adhesion and coating performance. You’ll receive a signed warranty certificate with your project details for complete confidence in your investment.
The 343 Epoxy Metallic System
STEP 1 – Surface Prep, Diamond Grinding
A perfect finish starts with flawless prep. We mechanically grind the entire concrete surface using industrial diamond grinders attached to HEPA-filtered vacuums. This removes old coatings, sealers, and surface contaminants while creating a clean, porous profile for the coating to bond.
Every corner and edge is detailed by hand to ensure complete coverage. Once grinding is complete, we vacuum and clean the entire area — no dust, no residue, just raw, clean concrete ready for coating.
⸻
STEP 2 – Crack and Surface Repair
Concrete flaws get fixed before anything goes down. We open and fill cracks with a rapid-curing polyurea filler and patch any pits or uneven areas to create a smooth, uniform surface.
After repairs are complete, we do a full cleanup pass, ensuring the surface is completely ready for the next step.
⸻
STEP 3 – Moisture Vapor Barrier (MVB)
Moisture is one of the biggest reasons epoxy floors fail — not with us. We apply a 100% solids Moisture Vapor Barrier (MVB) to block moisture migration through the concrete and guarantee long-term adhesion.
This layer penetrates deep into the slab, sealing the pores and providing a rock-solid foundation for the metallic system.
Once cured, we inspect the surface and prep it for the next coating stage.
⸻
STEP 4 – Basecoat Application
After the MVB has set, we roll out a pigmented epoxy basecoat that acts as both a bonding layer and a color foundation for the metallic design.
The basecoat is evenly applied across the surface, building a smooth, consistent layer that enhances the metallic depth and flow in the final coat.
⸻
STEP 5 – Metallic Design Coat
This is where the artistry begins. We mix metallic pigments into a clear epoxy resin and pour it across the floor in a fluid, controlled motion. Using brushes, squeegees, and artistic techniques, we create natural movement and dimension that shift and change with the light.
Every metallic floor is one of one — no two designs will ever look the same. You can choose bold and dramatic tones or soft, fluid blends depending on your style and space.
⸻
STEP 6 – Urethane or Polyaspartic Topcoat
To seal and protect your new metallic floor, we apply a UV-resistant clear topcoat — either polyaspartic or urethane, depending on the environment. This layer locks in the design and adds long-term protection against abrasion, chemicals, and UV exposure.
Typical Curing Times:
• Light foot traffic, 12–18 hours
• Normal use, 48 hours
• Furniture or storage, 72 hours
• Vehicle traffic, 96 hours
Our team will give you the exact cure schedule based on local weather and humidity to ensure the perfect finish.
⸻
Clean and Ready
When we’re done, the jobsite is spotless. No dust, no debris — just a mirror-like metallic finish that turns heads the second you walk in.
⸻
10-Year Limited Warranty
Every 343 Epoxy Metallic Floor is backed by our 10-year limited warranty, covering adhesion and coating performance. You’ll receive a signed warranty certificate with all project details for full confidence and peace of mind.
Finish Top Coat
Need Epoxy Flooring Near You? We're Just a Call Away!

Join our community and experience a journey of contentment and success.
Join our community and experience a journey of contentment and success.
Newsletter
Sign up to get updates & news.
© 2025 All Right Reserved by 343 EPOXY